Process sequencing

Although the Secondary outputs primarily enable the user to control multiple Outputs simultaneously by linking other Processes and controlling their Outputs, when combined with the Timeout Off event, they can be leveraged to effectively support user-defined output sequences.
The fundamental concept of sequencing is that each step in the sequence is represented by a single Process. Each of the defined processes remains active for a specified Timeout duration, after which it automatically initiates the subsequent Process in the series. For this mechanism to function properly, each of them must have:
- The Process representing the immediately following step in the sequence selected as one of the Secondary outputs with an
Off -> OnResponse. This ensures immediate initiation of the following step once the preceding step ends. Naturally, this does not apply to the last step of the non-repeating sequence. - A non-zero Running time set for the Timeout, selected as an Off event. This defines the length of each individual step in the sequence.
- An empty On event, to ensure the smooth progression of the sequence without disruption.
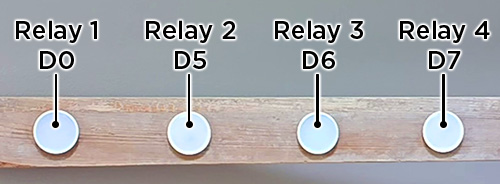
To illustrate, let us use a 4-channel relay module,
where Relays 1-4 are connected to pins D0, D5, D6, and D7, respectively.
These are tasked with controlling a prefabricated light board as follows:
Sequence start
Start by choosing four Processes and Naming them Seq_1, Seq_2, Seq_3, and Seq_4, respectively.
Starting from the default setting, configure all four identically with the following parameters:
- Main state:
Auto - Off event:
Timeout - Running time:
1 sec
These settings will ensure that the designated Relays automatically turn OFF one second after being activated.
However, turning ON of these processes must be controlled externally, as they will not initiate on their own.
Next, define the first step of the sequence, which involves flashing the first light (Relay 1 connected to D0).
To do this, navigate to the Seq_1 process and set its Primary output to D0 (Relay 1).
Finally, click ON within the same process' Output section to initiate the sequence:
Next steps
While you are still in the Seq_1 process, select Seq_2 as the Secondary output with the Off -> On
Response. Now, go to the Seq_2 process and choose D5 (Relay 2) as the Primary output.
Back in the Seq_1, press ON again.
This time, dimming the first light automatically turns ON the second light. Proceed by completing the sequence with all four lights by filling in:
| Process | Primary output | Secondary output |
|---|---|---|
| Seq_1 | D0 | Seq_2, Off -> On |
| Seq_2 | D5 | Seq_3, Off -> On |
| Seq_3 | D6 | Seq_4, Off -> On |
| Seq_4 | D7 | - |
In the Seq_1, press ON:
For an additional exercise, you can rearrange the sequence according to the table provided below and start the sequence once more:
| Process | Secondary output |
|---|---|
| Seq_1 | Seq_3 |
| Seq_2 | Seq_4 |
| Seq_3 | Seq_2 |
Closing the loop
At this point, you can create a loop by choosing Seq_1 as the Secondary output with an Off -> On Response in the Seq_4 process.
When all steps are completed, this setup will cause the sequence to revert back to the first process and start over.
Adding pauses
Until now, the lights have been operating in immediate succession with no pauses in between. To introduce pauses, you'll need to create four additional Processes.
Name these new Processes Seq_1p, Seq_2p, Seq_3p, and Seq_4p, respectively, and set them up as follows:
- Main state:
Auto - Off event:
Timeout - Running time:
0.5 sec
Now, rearrange the Secondary outputs according to the table below:
| Process | Primary output | Secondary output |
|---|---|---|
| Seq_1 | D0 | Seq_1p, Off -> On |
| Seq_1p | - | Seq_2, Off -> On |
| Seq_2 | D5 | Seq_2p, Off -> On |
| Seq_2p | - | Seq_3, Off -> On |
| Seq_3 | D6 | Seq_3p, Off -> On |
| Seq_3p | - | Seq_4, Off -> On |
| Seq_4 | D7 | Seq_4p, Off -> On |
| Seq_4p | - | Seq_1, Off -> On |
Result is visible on the video below: